Showing posts with label Upholstery. Show all posts

10 March 2016

A long way to go

It has now been two years since my cancer diagnosis and I am pleased to say that, so far, my recovery has gone well.   I am so thankful to my doctors and family who have all supported me through a difficult time.   Now that my energy levels are returning, I realise just how  draining the whole experience has been and how low my stamina had become.  I did manage to keep my creative life going but sometimes I had to push myself to achieve small things.  However, I am so happy that I now have the desire as well as the energy to throw myself back into what I love doing.

As I look around me, I see all the things that I have been wanting to do, but have been putting off because they were just "too hard".  Recovering these chairs was one such job.  

One of the reasons it was "too hard" was because I couldn't find the fabric I wanted.  I knew that one day I would find it and, sure enough, a trip to the Columbia Road flower market in London of all places, elicited just the fabric I had been searching for.  Tucked away in a small side street I found a shop selling furnishing fabric so once we had stocked up with tulips and hyacinths, I stocked up with my new elusive fabric.


Once home in Australia, I didn't waste too much time before I applied said fabric to the chairs and I think the result speaks for itself.


I can't believe I had to travel so far to find something so simple.

06 October 2012

Re-upholstery 101 ..... or how to make a slipcover for a wingback chair

Luckily for me, this chair became surplus to Mum's requirements. However, it was in desperate need of a makeover. The following is a tongue in cheek tutorial of how I went about this. Firstly, I set aside six months. Five and a half months to look at the chair and wonder why I take on these projects; gather my supplies; think about how I could accomplish this; and, for the other two weeks, grab whatever time I could, and working in half hour to an hour bursts (I am what could be described as a bit 'time poor'), actually start work. The first thing I tackled was the cushion. Well, I have made enough cushions over the years for this part to be relatively simple, even if the cushion is a very weird shape. I made a pattern for the end sections using some tracing paper and a Sharpie pen, cut two of these out and added some piping.
I was not going to use piping, but decided that this was being lazy so I compromised and used it sparingly.
Once the cushion and the two end sections (don't know what else to call them) were made, the easy part was over and I knew that the next sections were going to call for a bit more head scratching. Five and a half months of thinking about how I was going to accomplish this project did not actually produce any real plans. Instead all I had was a fuzzy idea in my head of what to do. At about this stage of the process, I took a break and made a pretty hat for a sweet little girl who needed a new hat for summer. I tried not to be deterred by the fact that upon seeing said hat, Mandy decided that her family could also use new hats. So I factored in three more hats and got back to the chair.
I decided it would be a good idea to make the cover in calico. This served two purposes. Firstly it would give me a practise run before I cut into my good fabric and secondly it would ensure that the existing fabric on the chair did not show through the new cover as the fabric I had bought was not very thick. I started by pinning and draping a piece of calico over the arm of the chair and then, scary part, I cut away all the excess fabric.
I then used this piece to make an identical piece for the other side of the chair.
I then made a pattern for the back and front of the wing section of the chair and cut out two pieces of each (one for each side). I should add here that it is important to leave a generous seam allowance when cutting.
Then I placed all these pieces over the chair and pinned them together.
I cut out another piece of calico for the end sections and pinned these in too.
Once the two sides had been completed, I cut out fabric for the base and the skirt at the front of the chair and pinned these to the sides.
Lastly I added a piece for the back rest and another for the very back of the chair. The result was like an inside-out coat for the chair.
I trimmed away a lot of the excess fabric, then very carefully lifted the whole thing off the chair and took it to the sewing machine where I stitched all the pinned seams together.
I then repeated the whole process with the good fabric, but this time I sewed the sections together as I went because I had found it difficult to get the seams to join together neatly when several of them met at the one point. Messy!
Holding my breath, I gave the chair its new coat and breathed a huge sigh of relief. It fitted and it looked good.

03 September 2011

How to make an ottoman

Or to be more precise - how I made an ottoman.

The coffee table in our living room is too dark, too large and little people keep bumping their precious heads on it. So in order to make the room more child-friendly and to create more space, I decided to replace it with an ottoman.


Of course, I could have gone out and bought one but, me being me, why do that when I could make one to my own specifications at a fraction of the cost. So this is what I did.

Firstly I helped Melissa & Stewart paint their garage. What's that got to do with making an ottoman? Well, in the process of clearing out the garage prior to painting I spied a piece of plywood which had been left over from recent renovations and in true bartering fashion, I traded my painting services for the plywood which Stewart cut to the size I wanted: 90cms x 60 cms. I had my perfect base. I should say here that both John and I are hopeless DIYers and have very limited tools available. Those that we do have are very basic and/or rusty so I needed plenty of help when it came to cutting things to size.

Next I gathered all my supplies; foam rubber which Clark Rubber also cut to size, four legs from the hardware shop, wood stain, screws, wood glue, a couple of pieces of pine to strengthen the ply, and linen fabric (purchased very reasonably from Ikea) to cover the foam.


I also cut out a few pictures from magazines of various ottomans so that I had an idea of what I was trying to achieve.


All this then gathered dust in the garage while I gathered the strength to tackle the project.

Finally, feeling motivated to start, I gave the legs a coat of varnish in a colour which vaguely matched our existing furniture. While this was drying, I decided to get the base ready. I glued the pine to the plywood and then screwed them together.


The reason I used the pine was because the ply was a bit thin and as the ottoman will probably be used as a seat, I didn't want there to be any embarrassing incidents with a guest landing in an undignified heap on the floor because of the ottoman collapsing underneath them. I had a couple of offcuts of pine so I glued and screwed them on as well for extra strength.


It looks a bit dodgy and I don't know if it will make a difference, but I had the wood so I decided to use it.

I could have used a solid piece of MDF, but I thought it would be too heavy and I wanted to be able to move the ottoman around easily.

I was beginning to feel like Rob from Better Homes & Gardens with all my glueing and screwing. However, I was under no illusions that my project would be finished in 3 minutes like his are.

By this time, I had had enough and needed a cup of tea. It was time for a gentler pursuit so I sat down for some stitching.


Some time later,(about three days) I decided it probably would have made more sense to attach the legs before staining them so this is what I did next. Perhaps the title of this post should be "how not to make an ottoman".

Once all the legs had been glued and screwed, I gave them two more coats of stain.


Next, I piled the foam rubber pieces on to my base and to make sure I was happy with the height I took it all inside and put it in situ.
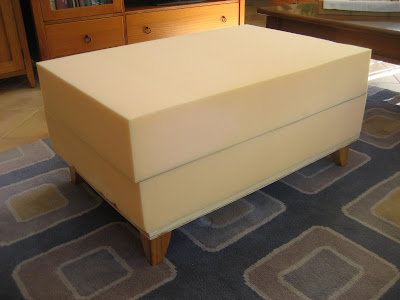


The height was good, but when I sat on it the base did bow a bit, so it was back to the hardware store for more pine which was glued and screwed. Athough I think an elephant could now sit on this without it breaking, I will still feel a bit apprehensive about it being used as a seat. Perhaps I will pile it with books and magazines to discourage this.


Next I covered the whole thing with wadding.


I did this to soften the hard straight lines of the foam rubber and to give it a more upholstered appearance.

Then it was off to the sewing machine to make the cover. Now I am in more familiar territory - no more glueing and screwing.

I cut a piece of fabric the same size as the top and added piping to the edges.


Then I cut a piece of fabric for the sides and attached this to the top making sure I left plenty of fabric which could be turned under and stapled to the base.


Then I pulled the new cover over the foam.


Now the ottoman was upended while I went mad with the staple gun. My next fear, after the one about the whole thing collapsing, was that the fabric would pull away from the base if too much pressure was put on it.


With some trepidation, it was taken to its new home and prettied up a bit.


So, that's how I did it and I am sure there are lots of better ways, but I'm pretty happy with the result and there will be no more bumped heads.

28 January 2010

A fruity story


This little piece of furniture has been in use in our family since my mother (now almost 90) was a young woman. She passed it on to me and I used it until I left home. When I had children I used it for their tiny things. Then I passed it on to Melissa who used it for many years and now she is going to use it for her new baby. Over the years, it has been recovered many many times and its coverings give a wonderful insight into the colours and styles of the years past.


It was time for its latest incarnation. So one recent hot day, Melissa and I shut all the doors and windows, cranked up the air conditioning and set to work. The last time it had been recovered was when Melissa was a teenager. I had forgotten what was hiding under all those layers of wallpapers and fabrics and it was so exciting to see it again. The drawers have been made from old fruit boxes, sultanas to be precise.


As Melissa and I were laboriously pasting down new layers of wallpaper to cover all the rough surfaces, Mum, who had called by to give us some encouragement, explained that during the depression in the 1930s it was very common for people to make furniture from old fruit packing cases and these pieces are now called Depression-Era Furniture. So our little chest of drawers has an official name and I immediately felt guilty that we were covering up history. However, practicality won the day and we continued. It would be impossible to keep the baby's delicate little things in such rough drawers and, in its raw state, the piece could really only be displayed in appropriate surroundings, not the pale, clean, chic look of Melissa and Stewart's home.

By the end of the day we had this to show for our efforts.


With a little extra work by Melissa and Stewart that night, this is the finished result.


These little owls were the inspiration for the colours we chose for the quilt.