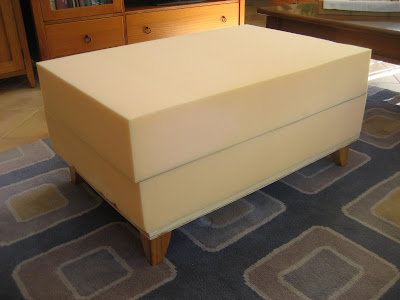
The coffee table in our living room is too dark, too large and little people keep bumping their precious heads on it. So in order to make the room more child-friendly and to create more space, I decided to replace it with an ottoman.

Of course, I could have gone out and bought one but, me being me, why do that when I could make one to my own specifications at a fraction of the cost. So this is what I did.
Firstly I helped Melissa & Stewart paint their garage. What's that got to do with making an ottoman? Well, in the process of clearing out the garage prior to painting I spied a piece of plywood which had been left over from recent renovations and in true bartering fashion, I traded my painting services for the plywood which Stewart cut to the size I wanted: 90cms x 60 cms. I had my perfect base. I should say here that both John and I are hopeless DIYers and have very limited tools available. Those that we do have are very basic and/or rusty so I needed plenty of help when it came to cutting things to size.
Next I gathered all my supplies; foam rubber which Clark Rubber also cut to size, four legs from the hardware shop, wood stain, screws, wood glue, a couple of pieces of pine to strengthen the ply, and linen fabric (purchased very reasonably from Ikea) to cover the foam.

I also cut out a few pictures from magazines of various ottomans so that I had an idea of what I was trying to achieve.

All this then gathered dust in the garage while I gathered the strength to tackle the project.
Finally, feeling motivated to start, I gave the legs a coat of varnish in a colour which vaguely matched our existing furniture. While this was drying, I decided to get the base ready. I glued the pine to the plywood and then screwed them together.


The reason I used the pine was because the ply was a bit thin and as the ottoman will probably be used as a seat, I didn't want there to be any embarrassing incidents with a guest landing in an undignified heap on the floor because of the ottoman collapsing underneath them. I had a couple of offcuts of pine so I glued and screwed them on as well for extra strength.


It looks a bit dodgy and I don't know if it will make a difference, but I had the wood so I decided to use it.
I could have used a solid piece of MDF, but I thought it would be too heavy and I wanted to be able to move the ottoman around easily.
I was beginning to feel like Rob from Better Homes & Gardens with all my glueing and screwing. However, I was under no illusions that my project would be finished in 3 minutes like his are.
By this time, I had had enough and needed a cup of tea. It was time for a gentler pursuit so I sat down for some stitching.

Some time later,(about three days) I decided it probably would have made more sense to attach the legs before staining them so this is what I did next. Perhaps the title of this post should be "how not to make an ottoman".
Once all the legs had been glued and screwed, I gave them two more coats of stain.

Next, I piled the foam rubber pieces on to my base and to make sure I was happy with the height I took it all inside and put it in situ.

The height was good, but when I sat on it the base did bow a bit, so it was back to the hardware store for more pine which was glued and screwed. Athough I think an elephant could now sit on this without it breaking, I will still feel a bit apprehensive about it being used as a seat. Perhaps I will pile it with books and magazines to discourage this.

Next I covered the whole thing with wadding.

I did this to soften the hard straight lines of the foam rubber and to give it a more upholstered appearance.
Then it was off to the sewing machine to make the cover. Now I am in more familiar territory - no more glueing and screwing.
I cut a piece of fabric the same size as the top and added piping to the edges.
Then I cut a piece of fabric for the sides and attached this to the top making sure I left plenty of fabric which could be turned under and stapled to the base.

Then I pulled the new cover over the foam.

Now the ottoman was upended while I went mad with the staple gun. My next fear, after the one about the whole thing collapsing, was that the fabric would pull away from the base if too much pressure was put on it.


With some trepidation, it was taken to its new home and prettied up a bit.


So, that's how I did it and I am sure there are lots of better ways, but I'm pretty happy with the result and there will be no more bumped heads.


1 comment:
Wow, it is just marvellous. Forget Tara and Rob from Better Homes etc - I think you should become an Ottoman Specialist!!
I look forward to seeing the real thing soon.
Post a Comment